> For the complete documentation index, see [llms.txt](https://mpithemes.gitbook.io/shella-shopify-theme/llms.txt). Markdown versions of documentation pages are available by appending `.md` to page URLs; this page is available as [Markdown](https://mpithemes.gitbook.io/shella-shopify-theme/get-started.md).
# Get Started
## Install theme
1. Download the theme package from [**themeforest.net**](https://themeforest.net/downloads)
You can purchase the theme [**here**](http://bit.ly/2DOThWb)
2. **Unzip** the downloaded file and **find** the theme's zip file inside
3. Log in to your Shopify store
4. Navigate to themes. [*Store Admin -> Online Store -> Themes*](https://shopify.com/admin/themes)
5. Upload theme
6. Publish theme
#### Video manual. How to install the Shella theme.
{% embed url="" %}
## Activate theme
You should activate your theme copy. Please check [*Theme settings -> License* ](https://mpithemes.gitbook.io/shella-shopify-theme/theme-settings/license)documentation page for more details.
A regular theme license allows you to use a theme at one store. If you want to use the theme for more stores, you should purchase a new license.
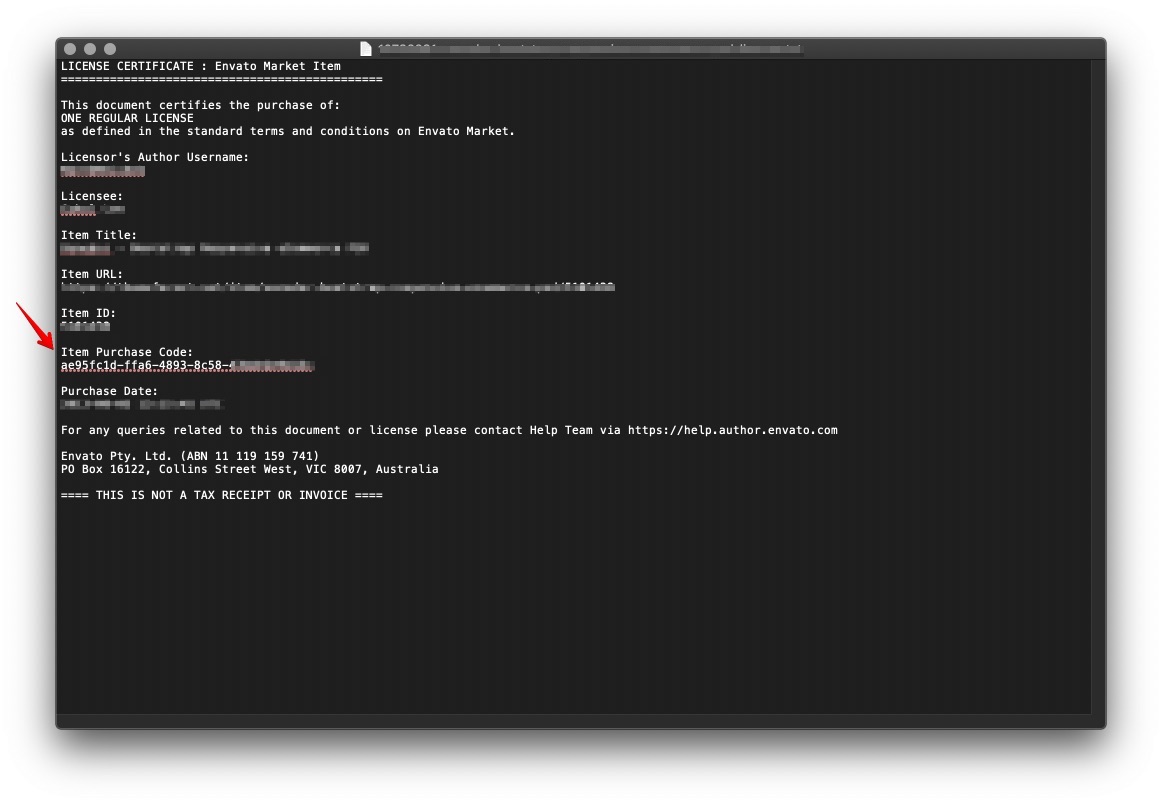
1\. Download the Txt file with the theme purchase code from your [themeforest.net](https://themeforest.net/downloads) account Download the purchase code.
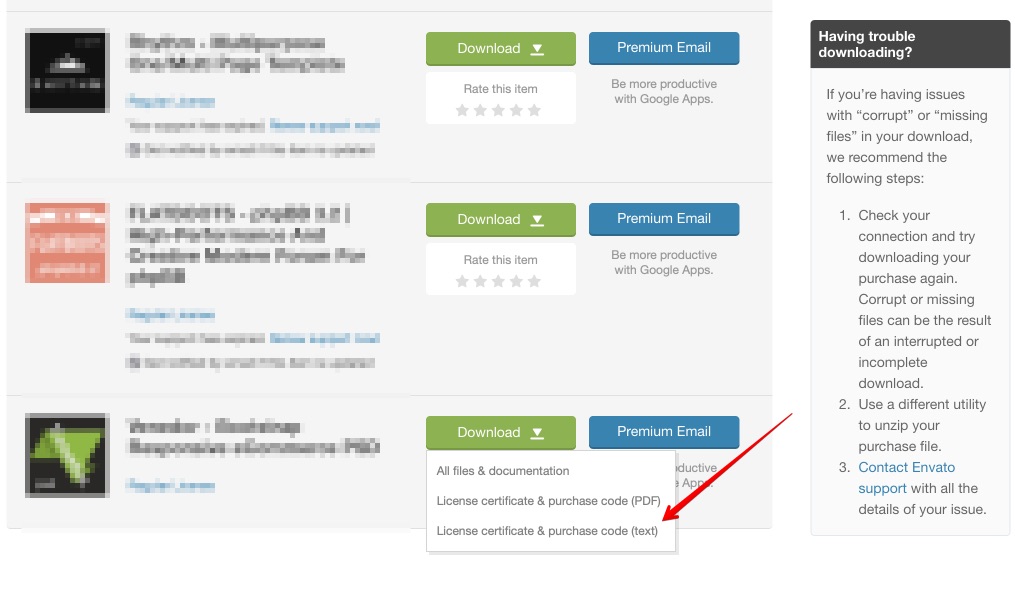
2\. Find your purchase code.
3\. Paste it to theme settings at *Online store -> Themes -> Customize -> Theme settings -> License -> Purchase code.*

4\. Save theme settings.
### Envato Market Help Page
If you can't find a purchase code on your Themeforest account, please check [**Where Is My Purchase Code?**](https://help.market.envato.com/hc/en-us/articles/202822600-Where-Is-My-Purchase-Code-) help page for more details.
## Update theme
Usually, the theme files are edited by webmasters or apps. Major theme updates include a lot of changes. That is why it is not an easy task to update the theme.
All the theme versions are tested before release. An update to the latest version is not obligatory. You may stay with your current version.
You can review the [**change log**](https://themeforest.net/item/shella-ultimate-fashion-responsive-shopify-theme/22804833#item-description__change-log) on the [**Themeforest description page**](https://themeforest.net/item/shella-ultimate-fashion-responsive-shopify-theme/22804833).
If you have a highly customized store or want to install a major theme update, I recommend starting from scratch. Please note, a major update is from version 1 to version 3, or from version 2 to version 3. A minor update is from version 3.1.x to 3.3.x. A bugfix update is from 3.3.1 to 3.3.4.
The following update process is good for minor and bug-fix updates.
The update process is similar to the installation process, with additional steps - export/import theme settings.
1. Duplicate your current theme under *Online Store -> Themes*, choose a theme, and press the *dotted \[...]* button next to “*Customize”.* Then hit the “*Duplicate”.*
This is a backup copy in case something goes wrong.
2. Upload the latest theme version to your store. Check the [**Install theme**](https://mpithemes.gitbook.io/shella-shopify-theme/get-started#install-theme) for more details.
3. Navigate to *Shopify Admin -> Apps -> ExIm app -> Theme settings*. In the section “Export*”*, select the theme to export theme settings:

4\. In the “Import” section, select the destination theme to import the downloaded theme settings -> press “Add file” -> select the exported Archive -> press “Import theme settings”:

5\. Check app configuration. Perform installation steps if needed.
6\. Apply custom code changes. If your store has it.
#### Video manual. How to update the theme
{% embed url="" %}
## Install apps
{% hint style="warning" %}
The Shella theme is compatible with all popular apps.
If you have an issue with app installation or app usage, please contact its support first.
If app support has questions about theme files, they can email questions to
{% endhint %}
#### Here is the list of recommended apps
{% hint style="warning" %} **Important!** The Basic Wishlist app is unavailable for use now due to Shopify updates! Use any app from the Shopify App Store that provides the desired functionality.
{% endhint %}
* Basic Wishlist (free, optional, Wishlist/Compare)
1. Go to the Shopify App Store and [**Install the Basic Wishlist app**](https://apps.shopify.com/wishlist-36)
2. Apply general configurations to use the app.
* Shopify Search & Discovery app (free, optional, filtering)
1. Go to Shopify Admin -> Apps -> Search & Discovery app.
2. Apply general configurations to use the app.
* Shopify Translate & Adapt app (free, optional, multi-language)
1. Go to the Shopify App Store and [**Install the Translate & Adapt app**](https://apps.shopify.com/translate-and-adapt)
2. Apply general configurations to use the app.
* Weglot Translate (paid, optional, multi-language)
1. Go to the Shopify App Store [**Install the Weglot Translate app**](https://apps.shopify.com/weglot)
2. Press the “Add app” button and proceed with the general app installation procedure.
3. Use a Promo Code: LUKWG20
* ExIm (free, optional, import demo data)
1. Go to the Shopify App Store and [**Install the ExIm app**](https://apps.shopify.com/exim-export-import-pages-blogs-theme-settings)
2. Press the “Add app” button and proceed with the general app installation procedure.
3. Find demo data inside the theme package in `demo-data` folder.
{% hint style="warning" %}
To use the **ExIm app** for free, add the theme purchase code in Apps -> ExIm app -> Coupon -> Coupon code. For how to find the purchase code, you can find [**here**](https://mpithemes.gitbook.io/shella-shopify-theme/get-started#activate-theme).
{% endhint %}
* JivoChat (paid, optional)
1. Go to page [**jivochat.com**](https://www.jivochat.com/?partner_id=31469\&pricelist_id=104\&lang=en)
2. Sign up
3. Use the code “MPTHEMES” to get the 15% discount.
* Growave (paid, optional)
Follow the link below and get an extended 30-day free trial.
1. Go to page [**growave.io**](https://growave.io/?ref=mari)
2. Sign up
* PageFly (paid, optional)
Follow the link below and get 20% off any paid plan.
1. Go to page [**pagefly.io**](https://pagefly.io/pages/partner-mpithemes?ref=mpithemes)
2. Sign up
* Metafields Guru (free, optional, labels, countdown, size chart)
1. Go to Shopify App Store [**Metafields Guru**](https://apps.shopify.com/metafields-editor-2) app
2. Press the “Add app” button and proceed with the general app installation procedure.
3. Check meta fields supported by the Shella theme.
## Theme structure
In this section, you will find general information on the theme structure. How to organize theme options and sections.
### Theme package
When you download the ZIP file from Themeforest, don't upload it to the Shopify store. You have to unzip it, find the theme ZIP file inside, and follow the installation steps.
The theme package includes
`/themeforest-shella-***-theme.zip`
* `/!-start-here.html`
* `/!-upload_me_Shella_theme_X.Y.Z.zip`
* `/demo-data/`
* `/user-manual/`
| File/Folder | Purpose |
| ------------------------------------- | ----------------------------------------------------------------------------------------------------------------------------------------------------------------------- |
| `/!-start-here.html` | Read me file with quick start information. |
| `/!-upload_me_Shella_theme_X.Y.Z.zip` | Theme ZIP file. Upload this file to your Shopify store. |
| `/demo-data/` | Demo data from our demo store. It includes Pages, Blog posts and Theme settings. You can import demo data using ExIm app. Check install theme article for more details. |
| `/user-manual/` | index.html file with redirect to online user manual. You are reading it right now. |
### Theme Settings
*Online Store -> Themes -> Customize -> Theme settings* - this is the first location where you should look for theme options.
Here you can change the general theme setting, which applies to all store pages.
Logo, Typography, Colors, Layout, etc. All options have a description and should be clear to you. If you don't find the needed option, try searching in sections.
Check the [**Editing theme settings**](https://help.shopify.com/en/manual/using-themes/change-the-layout/theme-settings) Shopify help page for more information about the theme settings customizer.
### Dynamic sections
These sections are available on almost all pages. You can build a unique webpage for your store using dynamic sections.
*Online Store -> Themes -> Customize -> Sections -> Template-> Add section* to add a new section. You can also delete dynamic sections and change their position.
The Shella theme includes many dynamic sections like Product carousel, Collections, One Product, Brands carousel, Article carousel, and Builder.
The Builder section is the most powerful. It has many block types. You can set a custom width per block in Banners (Promo boxes), Sliders, Instagram, etc.
### Static sections
These sections are used for mandatory, static elements. Static sections may be global and available on all store pages, like Header, Footer, Popup, etc.
You can change section options at *Online Store -> Themes -> Customize -> Sections*. You can remove static sections.
### Page sections
The hardest thing is to find sections. They are unique per product page. You should first navigate to the needed page to see the static sections available for this page.
For example, 'Product Page' and 'Related products carousel' sections for product pages. 'Sidebar' and 'Head' sections for collection pages.
{% hint style="warning" %}
**Please note**, the list of sections in the Sections tab will be different depending on the current page. You can navigate to a needed page via store preview or using the Shopify page type switcher. Please check the [**Editing theme settings**](https://help.shopify.com/en/manual/using-themes/change-the-layout/theme-settings) on the Shopify help page for more details.
{% endhint %}
#### Demo content
The theme package includes theme settings, pages, and blog posts from our demo stores. You can find it at `demo-data` folder in the theme package.
You can import the demo content using the [**ExIm**](https://apps.shopify.com/exim-export-import-pages-blogs-theme-settings) app.
{% hint style="warning" %}
**Please note** that you have to add your products and collections, configure navigation menus, and upload banner images by yourself. Images are not included in the theme package.
{% endhint %}